
No products in the cart.

Using Thingspeak to build a simple weather station with ESP8266 wifi module and Arduino
It is in every IoT (Internet of Things) enthusiast’s desire to build at least one IoT project in their lifetime. However, the cost of building a simple IoT project as well as the knowledge needed might be scary especially to newbies. In this esp8266-Arduino-Thingspeak project, we are going to learn how to build a simple and cheap weather station using the DHT11 temperature and humidity sensor, esp8266 wifi module, Arduino Uno microcontroller, and the Thingspeak open IoT platform, in seven simple steps.
7 Steps to building your simple esp8266-Arduino-Thingspeak weather station
I. What hardware do you need?
You will need at least the following items besides a breadboard and a couple of jumper wires:
- DHT11 sensor

The DHT11 sensor is a combined temperature and humidity sensor. It uses a capacitive humidity sensor, and a thermistor for a temperature sensor.
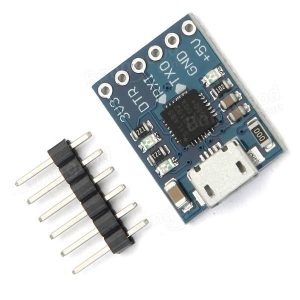
- CP2102
CP2102 is an ultra-cheap USB-to-UART bridge controller. However, it is used purposely as a logic level converter in this project. It is used to supply 3.3V to the wifi module. Other alternative logic level converters can be used in its place for this esp8266-arduino-thingspeak project.
- ESP8266 wifi module

This is probably the cheapest SOC with integrated TCP/IP stack built to give your microcontroller access to the WiFi network. It is a pretty robust module as it can also be used alone as an MCU with WiFi capabilities.
- Arduino Uno
This is arguably one of the most used open-source development boards. Its use in this project is pretty redundant as the EPS8266 can perform its functions. However, it has been used so that the DIYers who already have or are working on Arduino projects may learn how to connect to the IoT networks easily.


II. What software do you need?
- Arduino IDE
The Arduino IDE is the programming interface for your Arduino microcontroller. - DHT11 library
You need this library to convert the digital output of the DHT11 sensor to meaningful data. - Thingspeak
Thingspeak is not actually a software you need to install. It is an open IoT platform that provides good analytics for data. We shall send our data to thingspeak platform to present it in very nice graphs.
Assumptions
- The assumption made here is that you already have a WLAN that you can connect to with the ESP8266 Wifi Module.
- Another assumption made is that your module is already connected to the wifi network. You might want to look at an instructable I wrote about how to connect your esp8266 wifi module to the wifi network using AT mode .
III. Electrical schematic design

IV. Add DHT11 library to Arduino IDE
It is often good practice to not re-invent the wheel. Similarly, you dont have to waste your time trying to create your own code libraries while some already exist. In order to convert the digital output from the DHT11 sensor to meaningful data, we shall use a DHT11 library available from Adafruit site.
V. Create a Thingspeak Channel
How to Create ThingSpeak Channel for IoT Project
This video will show you how to create a ThingSpeak Channel and Dashboards on ThingSpeak IoT Platform. You will also learn how to generate API Key and insert it to Arduino code or any other code you want to transmit data to Thingspeak platform.
VI. Arduino code for logging data onto thingspeak channel
Arduino code
VII. Thingspeak IoT Charts
Once you start transmitting your data, Thingspeak will plot each data point nicely in individual charts. You can have as many as 8 charts being updated simultaneously depending on how many sensors you have connected to your Arduino or any other microcontroller. The figure below shows our weather station visualized nicely in charts.

Simple Weather Station IoT Project with ESP8266
This is the video for the simple internet of things weather station project. It demostrates how to use the DHT11 temperature and humidity sensor, ESP8266 Wi-Fi module, Arduino Uno, and Thingspeak open IoT Platform to create a weather station as discussed in this article.
Julioceaseless
Julioceaseless is an electrical and electronics engineer, a DIYer, and a tinkerer who also loves to dabble in code. On this website, he builds and shares tutorials for DIY projects he has completed. He also sells DIY components to local customers.